Windows Virtual Desktop Terraform Deployment Part 1
WVD Spring Update
I wanted to put together some articles to explain how you can use Terraform and the AzureRM provider to build out a Windows Virtual Desktop deployment.
I’ve been working with terraform since January 2021 as I can see the benefits that Infrastructure as Code (IAC) brings. I’m not a developer, I’d call myself a windows engineer with over 15 years supporting and looking after Microsoft products and mostly using VBScript and now Powershell to get everything I wanted to be done.
I based a lot of this work on the guys over at https://github.com/Azure/RDS-Templates however I couldn’t find anything online who was taking advantage of the WVD Spring Update where WVD is now fully integrated into AzureARM.
I’ll go through all the code and point out bits that I had issues with and some gotchas to help you out but you can find all the code in my github repo. [https://github.com/mdlister/Azure]https://github.com/mdlister/Azure
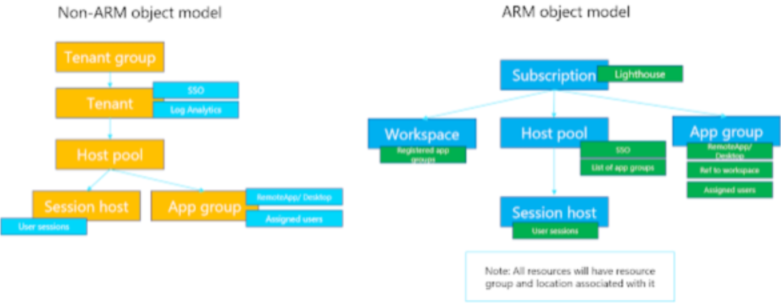
I found this diagram from Tom Hickling very useful to understand the terminology and required components to build https://techcommunity.microsoft.com/t5/itops-talk-blog/windows-virtual-desktop-spring-update-enters-public-preview/ba-p/1340245
Getting Started
Assumptions
You have an Azure Subscription You have Terraform downloaded and installed on your machine (we are using Terraform v0.14.4) You know a little Terraform code (tho I didn’t when I started and will break this down for you as we go) The VNet \ Subnet you place the Virtual Machine in has internet Access (required) You have an Active Directory Domain that the machine can join accessible from the Azure Subnet
High-Level Steps
- Build a Workspace
- Build a Hostpool
- Build a Virtual Machine
- Join the Virtual Machine to Active Directory
- Join the Virtual Machine to our Hostpool
Step 1 - Building the Workspace
Main.tf
provider "azurerm" {
  features {}
  subscription_id = var.subscription_id
}

resource "azurerm_resource_group" "example" {
  name     = "${var.prefix}-resources"
  location = var.region
}

resource "azurerm_virtual_desktop_workspace" "example" {
  name                = "${var.prefix}-workspace"
  resource_group_name = azurerm_resource_group.example.name
  location            = "eastus" #azurerm_resource_group.example.location
  Location has to be one of the following eastus,eastus2,westus,westus2,northcentralus,southcentralus,westcentralus,centralus
}{: class="pre"}
Main.tf contains all the code to create our resources, we also have variables.tf that contains all the variables which are available in the repo and we will go through them here as well.
First, we create a provider to talk to AzureRM resources, we have to specify any features and a subscription to use.
resource "azurerm_resource_group" "example" {
  name     = "${var.prefix}-resources"
  location = var.region
}
creates the resource group with a name from the variables file and appends -resources to the name so if var.prefix was AnotherITBlog the Resource Group would be AnotherITBlog-resources
next we create the workspace:
resource "azurerm_virtual_desktop_workspace" "example" {
  name                = "${var.prefix}-workspace"
  resource_group_name = azurerm_resource_group.example.name
  location            = "westeurope"
}
This resource only needs three values, the name of the workspace, what resource group to put it in and where is it going to store its meta-information. Previously in the Windows Virtual Desktop Classic, you could only select US locations, your data isn’t stored there just configuration data for the workspace \ Tenant
Now the following options are available eastus,eastus2,westus,westus2,northcentralus,southcentralus,westcentralus,centralus,westeurope,northeurope if you enter another value that isn’t supported Terraform will return an error from the provider telling you what locations are available.
Step 2 - Building the Hostpool
Main.tf
resource "time_offset" "example" {
  offset_days = 7
}
resource "azurerm_virtual_desktop_host_pool" "example" {
  resource_group_name = azurerm_resource_group.example.name
  name                = "${var.prefix}-hostpool"
  location            = "westeurope"

  validate_environment     = false
  type                     = "Pooled"
  maximum_sessions_allowed = 6
  load_balancer_type       = "BreadthFirst"

  registration_info {
    expiration_date = time_offset.example.rfc3339
  }
}
resource "azurerm_virtual_desktop_application_group" "example" {
  resource_group_name = azurerm_resource_group.example.name
  host_pool_id        = azurerm_virtual_desktop_host_pool.example.id
  location            = "eastus"
  type                = "Desktop"
  name                = "${var.prefix}-dag"
  depends_on          = [azurerm_virtual_desktop_host_pool.example]
}

resource "azurerm_virtual_desktop_workspace_application_group_association" "example" {
  application_group_id = azurerm_virtual_desktop_application_group.example.id
  workspace_id         = azurerm_virtual_desktop_workspace.example.id
}
After the workspace we have built our host pool, this is made up of four resources, each with its own input parameters all from variables.tf
resource "time_offset" "example" {
  offset_days = 7
}
The time_offset resource is built in to terraform and generates a timestamp with an offset, in this example we offset the time and date by 7 days. This is used when generating the Hostpool Token. If you have ever created a hostpool manually you will know you need to generate a host pool token from the Azure Portal, to do this you need to specify when the token will expire. This automates that generation for us.
resource "azurerm_virtual_desktop_host_pool" "example" {
  resource_group_name = azurerm_resource_group.example.name
  name                = "${var.prefix}-hostpool"
  location            = "westeurope"

  validate_environment     = false
  type                     = "Pooled"
  maximum_sessions_allowed = 6
  load_balancer_type       = "BreadthFirst"

  registration_info {
    expiration_date = time_offset.example.rfc3339
  }
}
Next up is the host pool resource itself, we have opted for a pooled host pool rather than specific machines assigned to users, we have also configured the maximum number of sessions allowed per machine and how we want to allocate users to the host pool.
The Registration block requires the value to be provided in rfc3359 format which we provide. This will automatically generate a token for us.
finally, it creates the desktop application group
resource "azurerm_virtual_desktop_application_group" "example" {
  resource_group_name = azurerm_resource_group.example.name
  host_pool_id        = azurerm_virtual_desktop_host_pool.example.id
  location            = "westeurope"
  type                = "Desktop"
  name                = "${var.prefix}-dag"
  depends_on          = [azurerm_virtual_desktop_host_pool.example]
}

resource "azurerm_virtual_desktop_workspace_application_group_association" "example" {
  application_group_id = azurerm_virtual_desktop_application_group.example.id
  workspace_id         = azurerm_virtual_desktop_workspace.example.id
}
These two resources are required, the desktop application group manages the assignments of the applications to users and the other to link the Hostpool to the Workspace (azurerm_virtual_desktop_workspace_application_group_association)
Step 3 - Building the Virtual Machine
Main.tf
resource "azurerm_network_interface" "rdsh" {
  count               = var.rdsh_count
  name                = "${var.vm_prefix}-vm-${count.index + 1}-nic"
  location            = var.region
  resource_group_name = azurerm_resource_group.example.name
  depends_on          = [azurerm_resource_group.example]

  ip_configuration {
    name                          = "${var.vm_prefix}-vm-${count.index + 1}-nic-01"
    subnet_id                     = var.subnet_id
    private_ip_address_allocation = "dynamic"
  }

}

resource "azurerm_windows_virtual_machine" "main" {
  count                 = var.rdsh_count
  name                  = "${var.vm_prefix}-vm-${count.index + 1}"
  location              = var.region
  resource_group_name   = azurerm_resource_group.example.name
  network_interface_ids = ["${azurerm_network_interface.rdsh.*.id[count.index]}"]
  size                  = var.vm_size
  zone                  = "1"
  timezone              = var.vm_timezone
  admin_username        = var.local_admin_username
  admin_password        = var.local_admin_password
  provision_vm_agent    = true
  computer_name         = "${var.vm_prefix}-${count.index + 1}"

  source_image_reference {
    publisher = "MicrosoftWindowsDesktop"
    offer     = "office-365"
    sku       = "20h2-evd-o365pp"
    version   = "latest"
}

  os_disk {
    name                 = "${lower(var.vm_prefix)}-${count.index + 1}"
    caching              = "ReadWrite"
    storage_account_type = "Standard_LRS"
    disk_size_gb         = var.vm_storage_os_disk_size
  }

}

resource "azurerm_managed_disk" "managed_disk" {
  count                = var.managed_disk_sizes[0] != "" ? (var.rdsh_count * length(var.managed_disk_sizes)) : 0
  name                 = "${var.vm_prefix}-${(count.index / length(var.managed_disk_sizes)) + 1}-disk-${(count.index % length(var.managed_disk_sizes)) + 1}"
  location             = var.region
  resource_group_name  = azurerm_resource_group.example.name
  storage_account_type = var.managed_disk_type
  create_option        = "Empty"
  disk_size_gb         = var.managed_disk_sizes[count.index % length(var.managed_disk_sizes)]

}

resource "azurerm_virtual_machine_data_disk_attachment" "managed_disk" {
  count              = var.managed_disk_sizes[0] != "" ? (var.rdsh_count * length(var.managed_disk_sizes)) : 0
  managed_disk_id    = azurerm_managed_disk.managed_disk.*.id[count.index]
  virtual_machine_id = azurerm_windows_virtual_machine.main.*.id[count.index / length(var.managed_disk_sizes)]
  lun                = "10"
  caching            = "ReadWrite"
}


resource "azurerm_virtual_machine_extension" "domainJoin" {
  count                      = var.domain_joined ? var.rdsh_count : 0
  name                       = "${var.vm_prefix}-${count.index + 1}-domainJoin"
  virtual_machine_id         = azurerm_windows_virtual_machine.main.*.id[count.index]
  publisher                  = "Microsoft.Compute"
  type                       = "JsonADDomainExtension"
  type_handler_version       = "1.3"
  auto_upgrade_minor_version = true

  lifecycle {
    ignore_changes = [
      "settings",
      "protected_settings",
    ]
  }

  settings = <<SETTINGS
    {
        "Name": "${var.domain_name}",
        "OUPath": "${var.ou_path}",
        "User": "${var.domain_user_upn}",
        "Restart": "true",
        "Options": "3"
    }
SETTINGS

  protected_settings = <<PROTECTED_SETTINGS
  {
         "Password": "${var.domain_password}"
  }
PROTECTED_SETTINGS


}

resource "azurerm_virtual_machine_extension" "custom_script_extensions" {
  count                = var.extension_custom_script ? var.rdsh_count : 0
  name                 = "${var.vm_prefix}${count.index + 1}-custom_script_extensions"
  virtual_machine_id   = azurerm_windows_virtual_machine.main.*.id[count.index]
  publisher            = "Microsoft.Compute"
  type                 = "CustomScriptExtension"
  depends_on           = ["azurerm_virtual_machine_extension.domainJoin"]
  type_handler_version = "1.9"

  lifecycle {
    ignore_changes = [
      "settings",
    ]
  }

  settings = <<SETTINGS
    {
      "fileUris": ["${join("\",\"", var.extensions_custom_script_fileuris)}"],
      "commandToExecute": "${var.extensions_custom_command}"
    }
SETTINGS


}

resource "azurerm_virtual_machine_extension" "additional_session_host_dscextension" {
  count                      = var.rdsh_count
  name                       = "${var.vm_prefix}${count.index + 1}-wvd_dsc"
  virtual_machine_id         = azurerm_windows_virtual_machine.main.*.id[count.index]
  publisher                  = "Microsoft.Powershell"
  type                       = "DSC"
  type_handler_version       = "2.73"
  auto_upgrade_minor_version = true
  depends_on                 = ["azurerm_virtual_machine_extension.domainJoin", "azurerm_virtual_machine_extension.custom_script_extensions"]

  settings = <<SETTINGS
{
    "modulesURL": "${var.base_url}/DSC/Configuration.zip",
    "configurationFunction": "Configuration.ps1\\AddSessionHost",
     "properties": {
        "HostPoolName":"${azurerm_virtual_desktop_host_pool.example.name}",
        "RegistrationInfoToken":"${azurerm_virtual_desktop_host_pool.example.registration_info[0].token}"
  }
}

SETTINGS

  protected_settings = <<PROTECTED_SETTINGS
{
  "items":{
    "tenantAdminPassword":"${var.tenant_app_password}"
  }
}
PROTECTED_SETTINGS


}
And that’s it, throw all this together with the variables.tf file with the values and it will build you a WVD environment.
We’ll go through all the resources there, some gotchas I found and wrap up with the code re-written into modules so it’s repeatable. This is just to understand the concepts.
We create the following Resources (ordered as the code)
- Network Interface
- Azure Virtual Machine
- Managed Disk
- Data Disk Attachement
- DSC Extensions
- DomainJoin
- Custom Script Extention
- Join the machine to host pool
Some notes worth mentioning here, I am not using Availability Sets, instead, I’ve opted for Azure Availability Zones if I want three machines, it will create a machine per zone spreading the load across the three zones. Also the type from “azurerm_virtual_machine” is going to be depricated so took advantage of using the new resource.
  source_image_reference {
    publisher = "MicrosoftWindowsDesktop"
    offer     = "office-365"
    sku       = "20h2-evd-o365pp"
    version   = "latest"
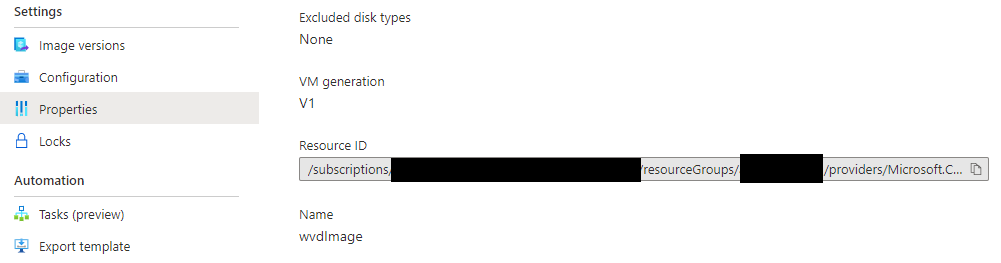
Here we reference the source_image_reference and specify we want the latest version of this image from the market place, if we wanted to use our own image this version of WVD supports Shared Image Galleries and you could swap out the code for something like this
source_image_id = "/subscriptions/____SubscriptionID____/resourceGroups/____resourcegroupname____/providers/Microsoft.Compute/galleries/____ShareImageGallerName____/images/____ImageName____"
you can get this information from the Azure Portal when you look at your Shared Image Gallery, click on the image you want to use and select properties
The only other parts worth mentioning are the DSC parts.
Custom Script Extention will go online and download the configuration.zip file from the Azure RDS Repo on Github. This contains the installation files required for the VM to become part of the Hostpool. It also has some powershell scripts that are used in the additional_session_host_dscextension part of the code.
{
    "modulesURL": "${var.base_url}/DSC/Configuration.zip",
    "configurationFunction": "Configuration.ps1\\AddSessionHost",
     "properties": {
        "HostPoolName":"${azurerm_virtual_desktop_host_pool.example.name}",
        "RegistrationInfoToken":"${azurerm_virtual_desktop_host_pool.example.registration_info[0].token}"
  }
}
It calls configuration.ps1 and then the function AddSessionHost this has two required parameters HostPoolName and RegistrationInfoToken which we can get from the code and pass into the Powershell function.
Why do we have to use registration_info[0].token I hear you say, good question…

When I ran the plan and apply I got the following error message, Registration_info is an object with three values so I have specified the token value. (In the module method of doing this I have done it slightly different outputting the token from the module and consuming it in another module but this way works too.

it’s also case sensitive!!
Finally, when it works, I also output the values on the screen just to see what they were, here you can see the three values the Registration_Information block holds
