Terraform on Azure DevOps, Day 2: Locking State & Managing Secrets with Azure Storage and Key Vault
Series goal (reminder): Stand up a practical, multi‑environment Terraform platform on Azure DevOps (with split pipelines for Infra/Entra/MS Graph), using secure auth, remote state, and reusable modules—scaling from Dev to Prod.
Day 2 — Locking State & Managing Secrets with Azure Storage and Key Vault
What you’ll build today
- Secure State Management: Bring the Azure Storage account and container you created in Day 1 under Terraform management (via import) and protect them with a CanNotDelete lock.
- Centralised Secrets: Create an Azure Key Vault as the single source of truth for pipeline secrets and sensitive variables.
- Dynamic Secrets in DevOps: Link the Key Vault to an Azure DevOps Variable Group so pipelines fetch the latest secret values at runtime—no secrets in YAML.
- Least‑Privilege Access: Assign precise RBAC on Storage & Key Vault to the pipeline identity used by your Workload Identity Federation (OIDC) service connection.
Day 1 recap: You already have a repo + pipeline authenticating to Azure via OIDC (no client secrets) and a remote state backend in Azure Storage with AAD/OIDC and blob lease locking. ([Day 1 post])
Why manage these resources via code?
Infrastructure that isn’t codified drifts—someone clicks a setting, policies change, and suddenly your pipeline fails. Infrastructure as Code (IaC) fixes that: every change is reviewed, versioned, and reproducible. Moving your Day 1 bootstrap (state storage) into Terraform means its security posture (versioning, retention, and locks) is enforced. If disaster strikes, you can rebuild environments from Git.
The Terraform azurerm backend stores state in Azure Blob Storage and uses Blob’s native lease‑based locking—safe for teams/CI. With
use_azuread_auth = trueit authenticates to the blob data plane using Entra ID (Azure AD).
• Backend docs: https://developer.hashicorp.com/terraform/language/backend/azurerm
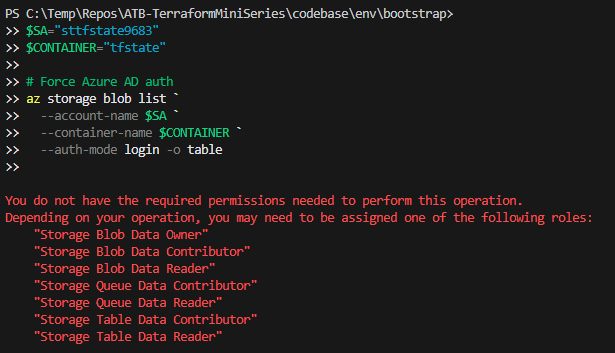
• Ensure your pipeline identity has Storage Blob Data Contributor on the state account/container (data plane), otherwiseterraform initwill fail.
Step 0 — Prereqs
- Azure subscription + permissions to assign roles and create resources.
- Azure DevOps org/project + ARM service connection using Workload Identity Federation (from Day 1).
- The state RG/storage/container from Day 1 (names you actually used).
Step 1 — Import the state storage into Terraform (and lock it)
We’ll create a small core‑infra module, then import the existing RG/Storage/Container so Terraform manages them going forward.
What terraform import does: it associates an existing cloud resource with a resource block in your configuration, adding it to Terraform state without changing it. From then on, Terraform tracks it for drift and enforces configuration. You still need to make your config match the real resource (same names/IDs), or Terraform will want to replace it during an apply.
1.1 Module layout
/codebase
  /modules
    /azure
      /core-infra
        main.tf
        variables.tf
        outputs.tf
/codebase/modules/azure/core-infra/variables.tf
variable "environment"      { type = string }
variable "location" {
    type = string
    default = "UK South"
}
variable "subscription_id"  { type = string }
variable "state_container"  {
    type = string
    default = "tfstate"
}
variable "state_rg_name"    { type = string }
variable "state_sa_name"    { type = string }
/codebase/modules/azure/core-infra/main.tf
resource "azurerm_resource_group" "state" {
  name     = var.state_rg_name
  location = var.location
  tags     = { environment = var.environment, managed-by = "terraform" }
}

resource "azurerm_storage_account" "state" {
  name                     = var.state_sa_name               # must match existing SA name
  resource_group_name      = azurerm_resource_group.state.name
  location                 = azurerm_resource_group.state.location
  account_tier             = "Standard"
  account_replication_type = "LRS"
  allow_nested_items_to_be_public = false

  blob_properties {
    versioning_enabled  = true
    change_feed_enabled = true
    delete_retention_policy { days = 30 }
  }

  tags = { environment = var.environment, managed-by = "terraform" }
}

resource "azurerm_storage_container" "state" {
  name                  = var.state_container                # e.g., tfstate
  storage_account_id    = azurerm_storage_account.state.id   # ARM path style
  container_access_type = "private"
}

resource "azurerm_management_lock" "state_storage_lock" {
  name       = "cannot-delete"
  scope      = azurerm_storage_account.state.id
  lock_level = "CanNotDelete"
  notes      = "Protect Terraform state storage."
}
/codebase/modules/azure/core-infra/outputs.tf
output "state_storage_rg_name"         { value = azurerm_resource_group.state.name }
output "state_storage_account_name"    { value = azurerm_storage_account.state.name }
output "state_storage_container_name"  { value = azurerm_storage_container.state.name }
1.2 Bootstrap config and imports
/codebase/env/bootstrap/
/codebase/env/bootstrap/main.tf
terraform {
  required_providers {
    azurerm = { source = "hashicorp/azurerm", version = "~> 4.0" }
  }
  backend "azurerm" {
    resource_group_name  = "rg-tfstate-core-uks"   # your actual names
    storage_account_name = "sttfstate9683"
    container_name       = "tfstate"
    key                  = "bootstrap/core.tfstate"
    use_azuread_auth     = true
  }
}

provider "azurerm" {
    features {}
    subscription_id = var.subscription_id
    }

module "core_infra" {
  source           = "../../modules/azure/core-infra"
  environment      = "bootstrap"
  subscription_id  = var.subscription_id
  state_rg_name    = "rg-tfstate-core-uks"
  state_sa_name    = "sttfstate9683"
  state_container  = "tfstate"
}
/codebase/env/bootstrap/variables.tf
variable "subscription_id" { type = string }
Run the imports (locally):
You’ll need Azure CLI installed on your machine https://learn.microsoft.com/en-us/cli/azure/authenticate-azure-cli-interactively?view=azure-cli-latest to do it from within Visual Studio Code which is the approach I’ve taken.
winget install Microsoft.AzureCLI
after installing, you will need to close all of the visual studio windows open for VSCode to pick up the new path variable for az login or you end up with an error saying I don’t know what you mean.
az login
cd codebase/env/bootstrap/
terraform init

terraform import -var "subscription_id=50b57618-d85f-4203-826a-2e464126e24b" module.core_infra.azurerm_resource_group.state /subscriptions/50b57618-d85f-4203-826a-2e464126e24b/resourceGroups/rg-tfstate-core-uks

terraform import `
  -var "subscription_id=50b57618-d85f-4203-826a-2e464126e24b" `
  module.core_infra.azurerm_storage_account.state `
  "/subscriptions/50b57618-d85f-4203-826a-2e464126e24b/resourceGroups/rg-tfstate-core-uks/providers/Microsoft.Storage/storageAccounts/sttfstate9683"


# Storage container import: provider versions differ
# Try ARM path first; if it fails, use the blob URL form
terraform import `
  -var "subscription_id=50b57618-d85f-4203-826a-2e464126e24b" `
  module.core_infra.azurerm_storage_container.state `
  "/subscriptions/50b57618-d85f-4203-826a-2e464126e24b/resourceGroups/rg-tfstate-core-uks/providers/Microsoft.Storage/storageAccounts/sttfstate9683/blobServices/default/containers/tfstate"
# or
terraform import module.core_infra.azurerm_storage_container.state   https://sttfstate9683.blob.core.windows.net/tfstate

Now we will run a plan, review whats going to change and then apply the changes if we are happy

terraform plan -var "subscription_id=50b57618-d85f-4203-826a-2e464126e24b"

After running the apply stage you will need to confirm the changes by entering yes.

terraform apply -var "subscription_id=50b57618-d85f-4203-826a-2e464126e24b"
I also got this error whilst running this:

some troubleshooting through the Azure CLI returned the problem, I needed to have more permissions over the storage, one of the roles defined in the message. I opted for Storage Blob Container Contributor.
Notes on container import: Recent provider versions sometimes accept the blob URL format when the ARM‑path style fails. See provider docs/issues for details.
• Storage container resource: https://registry.terraform.io/providers/hashicorp/azurerm/latest/docs/resources/storage_container
• Import syntax discussion: https://github.com/hashicorp/terraform-provider-azurerm/issues/29065
We have now successfully imported the resource group, storage account & container for the statefiles to be manged under terraform as well.
Step 2 — Create Key Vault (RBAC), assign permissions, add a demo secret (all in Terraform)
In many organisations, RBAC is the standard. We’ll create a Key Vault with RBAC, grant the pipeline identity read access to secrets, and add a small demo secret to prove the wiring—everything managed by Terraform.
This Key Vault will be used for the infrastructure across all environments and later we will develop a dev, test and prod keyvault for specific secrets for each environment.
If your org prefers the legacy Access policy model for ADO Variable Groups, you can flip the approach: set
enable_rbac_authorization = falseand replace the role assignment with anazurerm_key_vault_access_policythat grants Get, List.
Object ID needed as the pipeline_principal_id in bootstrap/main.tf is the It’s the objectID of the Enterprise App and not the application id.
Add to /codebase/modules/azure/core-infra/main.tf
data "azurerm_client_config" "current" {}

variable "pipeline_principal_id" {
  type        = string
  description = "Object ID of the Azure DevOps service connection principal"
}

resource "azurerm_key_vault" "secrets" {
  name                          = "kv-secrets-${var.environment}-uks"
  location                      = azurerm_resource_group.state.location
  resource_group_name           = azurerm_resource_group.state.name
  tenant_id                     = data.azurerm_client_config.current.tenant_id
  sku_name                      = "standard"
  enable_rbac_authorization     = true   # RBAC model
  purge_protection_enabled      = true
  soft_delete_retention_days    = 90
  public_network_access_enabled = true
  tags = { environment = var.environment, managed-by = "terraform" }
}

# Grant the pipeline SP read access to secrets (list/get)
resource "azurerm_role_assignment" "kv_secrets_user" {
  scope                = azurerm_key_vault.secrets.id
  role_definition_name = "Key Vault Secrets User"
  principal_id         = var.pipeline_principal_id
}

# Demo secret to prove end-to-end flow (non-sensitive example)
resource "azurerm_key_vault_secret" "demo" {
  name         = "tfstate-storage-account-name"
  value        = var.state_sa_name
  key_vault_id = azurerm_key_vault.secrets.id
}
Pass the pipeline principal ID in /codebase/env/bootstrap/main.tf
module "core_infra" {
  # ...existing args...
  pipeline_principal_id  = "YOUR-AZURE-DEVOPS-SERVICE-CONNECTION-OBJECT-ID"
}
Run terraform apply again from the bootstrap/ directory to create the Key Vault, assign RBAC, and add the demo secret.
I got an error here originally because I was still running Terraform locally from the VSCode terminal and my account wasn’t setup in RBAC as a Key Vault Secrets User so I was getting forbidden. Updated the permissions for my account within the portal and waited 10 minutes and then it worked. Had I used the azure devops pipeline it would have worked as we had already assigned the role to that account. As I was creating a Secret, i needed the role Key Vault Secrets Officer, the pipeline will only read secrets which is why it has the role of secets user. You’ll need to swap this if you want to create secrets in Terraform as well. (Not recommended)
RBAC role explanation: The Key Vault Secrets User role allows list/get on secrets in an RBAC‑mode vault (data‑plane). See: https://learn.microsoft.com/azure/key-vault/general/rbac-guide
We’ll also update the pipeline to allow you to run from the pipeline now instead of locally.
Step 2b — Updating the Pipeline for Environment Selection
What are we changing, and why? Up to now, your pipeline has used a hardcoded variable (e.g., envName: dev) to determine which environment (dev, test, prod) to deploy. This works, but it’s inflexible—every time you want to run against a different environment, you have to edit the YAML or create a separate pipeline. We’re going to improve this by:
Adding a dropdown parameter to the pipeline, so you can choose the target environment (dev, test, prod) each time you run it manually. Dynamically including the correct variable group(s) and working directory for the selected environment. Making the pipeline more robust, reusable, and friendly for both CI and manual runs.
Why is this important?
Flexibility: You can deploy to any environment without editing code. Safety: Reduces the risk of accidentally deploying to the wrong environment. Scalability: Makes it easy to add more environments in the future. Best practice: Mirrors how professional DevOps teams manage multi-environment deployments.
How does it work?
Parameters in Azure DevOps pipelines create a dropdown menu when you click “Run pipeline”. The pipeline uses compile-time expressions ($ ) to include the correct variable group(s) and set the working directory based on your selection. All Terraform commands (init, plan, apply) run in the folder for the chosen environment (e.g., codebase/env/dev).
pool:
  vmImage: ubuntu-latest


parameters:
- name: environment
  displayName: Target environment
  type: string
  default: dev
  values:
  - dev
  - test
  - prod
  - bootstrap


variables:
- name: envName
  value: $


$:
  - group: tf-dev
  # - group: kv-dev        # uncomment if you have a KV-linked group for dev

$:
  - group: tf-test
  # - group: kv-test

$:
  - group: tf-prod
  # - group: kv-prod
You can also add environment names to the stages as well.
stages: stage: Validate displayname: Validate ($(envName))
Step 3 — Link Key Vault to Azure DevOps (with RBAC) and use the secret at runtime
In Step 2b, we have already added key vault variable groups to our pipeline, we just need to make sure they now follow the format when creating them kv-environment so they match.
- Pipelines → Library → + Variable group (e.g., kv-environment).
- Toggle Link secrets from an Azure key vault as variables.
- Choose your ARM service connection (WIF) and Authorize.
- Select your Key Vault and Authorize.
- Add the secret
tfstate-storage-account-nameand Save.
How Variable Groups ↔ Key Vault works: Only secret names are mapped; values are fetched at runtime. Updates to existing secret values flow automatically; adding/removing new secret names requires updating the Variable Group’s selected list.
Important doc note: Microsoft’s page currently says RBAC‑mode vaults aren’t supported for this Variable Group feature. In our testing, RBAC did work when the pipeline principal had Key Vault Secrets User; behavior may vary by tenant/rollout. If it fails for you, switch to Access policies, or keep RBAC and fetch with the AzureKeyVault@2 task instead.
• ADO docs (support note): https://learn.microsoft.com/azure/devops/pipelines/library/link-variable-groups-to-key-vaults?view=azure-devops
• Key Vault RBAC guide: https://learn.microsoft.com/azure/key-vault/general/rbac-guide
Now all your code is in DevOps, you can delete the .terraform and the terraform.lock file from the bootstrap directory as the state is now in the cloud.
Troubleshooting
terraform initfails to reach state (403 or lease errors): ensure the pipeline principal has Storage Blob Data Contributor on the state account/container; confirm backend hasuse_azuread_auth = true- Variable Group can’t select secrets: confirm the pipeline principal holds data‑plane permissions (RBAC: Key Vault Secrets User) and the secret isn’t expired/disabled. If still blocked, use Access policies or the AzureKeyVault@2 task.
- Import drift: make sure your Terraform arguments (names/IDs) exactly match the existing resources before you import; computed names will cause replacement.
- Container import: if the ARM path fails, use the blob URL syntax shown above.
What’s next (Day 3)
- Multi‑environment structure (dev/test/prod) with reusable modules and
*.tfvars - Promotion patterns and environment‑scoped Key Vaults/Variable Groups.
- CAF‑aligned naming for consistency across your estate.